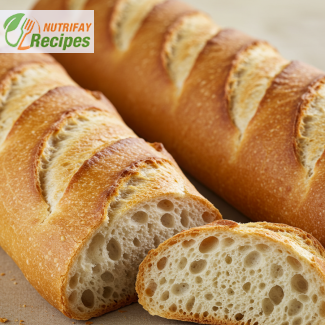
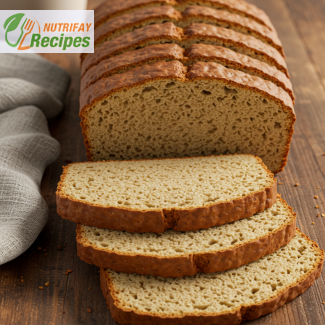
Few things are as comforting and rewarding as the aroma of freshly baked bread wafting through your home. This easy homemade bread recipe is designed for bakers of all skill levels, offering simplicity without sacrificing taste or texture. Whether you're a seasoned baker or a first-timer, this recipe will quickly become a staple in your kitchen.
Crafted to yield a loaf that is perfectly soft on the inside and golden brown on the outside, this recipe is your ticket to enjoying bakery-quality bread right from the comfort of your home. With just a handful of basic ingredients and a few straightforward steps, you’ll create a masterpiece that’s both delicious and versatile.
What Makes This Bread Special?
The secret to this recipe's success lies in its balance of flavor and texture. The dough is light and airy, resulting in a bread that’s delightfully soft with a tender crumb. A perfectly crisp crust adds a satisfying crunch, making every slice a delight.
This bread is wonderfully versatile—ideal for sandwiches, toasting, or enjoying with a simple pat of butter. The addition of pantry staples like flour, yeast, and salt means you can whip up a loaf whenever the craving strikes. Best of all, it’s free from unnecessary additives, giving you a healthier alternative to store-bought bread.
Why You'll Love This Recipe
- Foolproof for Beginners: Even if you’ve never baked bread before, this recipe guides you through every step with ease.
- Quick and Simple Ingredients: You likely already have everything you need in your kitchen.
- Customizable: Add herbs, seeds, or even cheese to make it uniquely yours.
- No Special Equipment Required: All you need is a bowl, a spoon, and an oven.
Why This Recipe Stands Out
1. The Perfect Texture
This bread achieves the perfect balance of soft and fluffy interiors with a crispy, golden crust. The texture makes it suitable for any meal or occasion.
2. Wholesome and Natural
Made with simple, everyday ingredients, this bread avoids preservatives and artificial flavors, ensuring you know exactly what you're eating.
3. Crowd-Pleaser
From hearty breakfasts to elegant dinners, this bread fits seamlessly into any menu. It’s sure to impress family, friends, and guests.
Your Turn to Bake
Don’t wait for the perfect moment to experience the joy of homemade bread. Start today, and discover how easy and satisfying baking can be. Gather your ingredients, roll up your sleeves, and let your kitchen fill with the irresistible scent of freshly baked bread.
The magic of baking lies not only in the result but in the process itself. Embrace the therapeutic rhythm of kneading dough, the anticipation as it rises, and the pride of slicing into a warm, golden loaf that you created.
This easy homemade bread recipe is more than just a recipe—it’s an invitation to create memories, one loaf at a time. Once you try it, you’ll find yourself returning to it again and again, tweaking it to make it your own, and sharing it with those you love. So, what are you waiting for? Bring a taste of homemade goodness to your table today!
1. Activate the Yeast
- In a large mixing bowl, combine warm water (300 ml / 1 ¼ cup), sugar (15 g / 1 tbsp), and active dry yeast (7 g / 2 tsp).
- Let the mixture sit for 5–10 minutes until it becomes frothy, indicating the yeast is active.
2. Mix the Dough
- Gradually add half the flour (250 g / 2 cups) to the yeast mixture and mix until combined.
- Add the salt (10 g / 2 tsp) and olive oil (30 ml / 2 tbsp), mixing well.
- Slowly incorporate the remaining flour (250 g / 2 cups), mixing until a soft dough forms.
3. Knead the Dough
- Transfer the dough onto a floured surface and knead for about 8–10 minutes until it becomes smooth and elastic.
4. First Rise
- Place the dough in a lightly oiled bowl, turning it to coat the surface.
- Cover with a clean kitchen towel or plastic wrap and let it rise in a warm place for 1 hour or until it doubles in size.
5. Shape the Dough
- Once risen, punch down the dough to release air.
- Shape the dough into a loaf and place it into a greased 23x13 cm (9x5 inch) loaf pan.
6. Second Rise
- Cover the loaf pan with a towel and let the dough rise for another 30 minutes, until it reaches the top of the pan.
7. Bake
- Preheat the oven to 200°C (390°F).
- Bake the bread for 30 minutes or until the top is golden brown and the loaf sounds hollow when tapped.
8. Cool
- Remove the bread from the oven and let it cool in the pan for 10 minutes.
- Transfer to a wire rack to cool completely before slicing.
Tips to Enhance and Modify the Easy Homemade Bread Recipe
This easy homemade bread recipe offers flexibility and room for creativity, making it a favorite among home bakers. Whether you're looking to adjust flavors, improve texture, or cater to specific dietary needs, small changes can make a big difference. Below, you’ll find professional advice and practical tips to transform this recipe into something truly unique.
Adjusting Ingredients for Flavor and Texture
Experimenting with Flour Types
- Whole Wheat Flour: Replacing up to 50% of the all-purpose flour with whole wheat flour adds a nutty flavor and increases the bread’s fiber content. Be aware that whole wheat flour absorbs more liquid, so you may need to add an extra 1–2 tablespoons of water to maintain a soft dough.
- Bread Flour: Using bread flour instead of all-purpose flour enhances the bread’s chewiness and structure due to its higher protein content. This substitution is ideal if you prefer a loaf with a more bakery-style texture.
- Gluten-Free Flour: Opt for a gluten-free flour blend to make this recipe suitable for those with gluten intolerance. Combine the flour with xanthan gum or psyllium husk for elasticity and structure.
Sweeteners and Their Effects
- Honey: Swap sugar for honey for a slightly sweeter and richer flavor. Honey also helps keep the bread moist. Use the same quantity (1 tbsp) but reduce the water slightly to account for the added liquid.
- Brown Sugar: For a deeper, caramel-like sweetness, substitute granulated sugar with brown sugar in the same amount.
Enhancing the Liquid Base
- Milk Instead of Water: Replacing water with milk yields a softer, richer bread with a slight creaminess. This is particularly suitable for sandwich bread or rolls.
- Buttermilk: Using buttermilk introduces a tangy flavor and tender crumb, perfect for those who enjoy a hint of complexity in their bread.
Adding Depth and Dimension with Mix-Ins
Seeds and Nuts
- Incorporate sesame seeds, sunflower seeds, or chia seeds into the dough for added crunch and nutritional benefits. Sprinkle some on top for visual appeal.
- Chopped walnuts or almonds add a rustic touch, enhancing both texture and flavor.
Herbs and Spices
- Fresh or dried rosemary, thyme, or oregano can transform the bread into a flavorful accompaniment for soups or stews.
- Adding a teaspoon of garlic powder or onion flakes gives the bread a savory twist.
Cheese
- Mix grated Parmesan, cheddar, or Gruyère into the dough for a cheesy, indulgent loaf. This pairs well with savory dishes or as a standalone snack.
Dietary Modifications
Lowering Sodium
- For a low-sodium version, reduce the salt to 5 g (1 tsp) without compromising the bread’s texture. Add herbs or spices to enhance flavor.
Reducing Fat
- Replace olive oil with unsweetened applesauce to cut down on fat. This keeps the bread moist while introducing a subtle sweetness.
Vegan-Friendly Adjustments
- If you use milk, switch to a plant-based alternative like almond milk, soy milk, or oat milk. These options yield similar textures without altering the overall flavor.
Impact of Technique Adjustments
Extending the First Rise
- Allowing the dough to rise for an additional 30 minutes during the first rise develops deeper flavors, as the yeast has more time to ferment. This creates a loaf with a more pronounced, tangy taste.
Refrigerating the Dough
- For a more complex flavor, let the dough rise in the refrigerator overnight. Cold fermentation enhances the bread’s aroma and taste, making it more similar to artisan-style loaves.
Steam Baking
- Place a pan of water on the bottom rack of your oven during baking. The added steam creates a crispier crust, perfect for rustic-style bread.
Troubleshooting Common Issues
Dense Bread
- If your bread turns out dense, it’s likely due to under-proofing. Ensure the dough doubles in size during the first rise. For best results, let it rise in a warm, draft-free environment.
- Over-kneading can also cause density by breaking down the gluten structure. Aim for 8–10 minutes of kneading or until the dough feels smooth and elastic.
Dry or Crumbly Texture
- Dry bread often results from adding too much flour. Measure your flour accurately, using a kitchen scale if possible.
- Avoid overbaking, as this can also dry out the loaf. Bake until the crust is golden and the loaf sounds hollow when tapped.
Enhancing the Crust
Glossy Finish
- Brush the loaf with an egg wash (1 beaten egg mixed with 1 tbsp of water) before baking for a shiny, golden crust.
- For a more matte finish, use milk instead of an egg wash.
Rustic Appeal
- Dust the top of the loaf with flour before baking for a rustic, artisan look.
Customizing this recipe not only allows you to adapt it to your personal preferences but also enhances its versatility. Small changes, such as altering the flour or incorporating mix-ins, can have a significant impact on both flavor and texture. Whether you want a simple loaf for everyday use or a more complex bread for special occasions, this recipe is your canvas to create. Experiment, enjoy, and let your creativity shine!
- Contains: Gluten (from wheat flour)
- Allergen-Free Option: Replace all-purpose flour with a gluten-free flour blend, and ensure yeast is gluten-free.
- Iron: 1 mg (supports red blood cell production)
- Vitamin B6: 0.1 mg (essential for brain health)
- Magnesium: 10 mg (beneficial for muscle and nerve function)
- Calcium: 8 mg (supports strong bones and teeth)
- Olive oil provides:
- Vitamin E: 0.5 mg (promotes skin health and immune function)
- Polyphenols: Small amounts (combat oxidative stress and inflammation)
Enjoy this easy, delicious homemade bread fresh from your oven!
Recipes worth trying